Friday, January 30, 2009

Steamed Hairy Gourd (Hairy Melon) with Dried Scallop Sauce

This is a very simple and healthy dish passed on from my mum. It's something I've had since little and one of the easiest mum recipe dishes :)

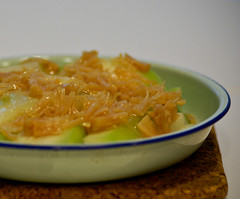
Hairy Gourd has various names (see Victoria Agriculture site) and is widely used in Chinese cooking for soups and dishes (mainly steamed and stir fried). It's always a more 'saucy' dish, it is plain and simple, but has a subtle sweetness to it which makes it a perfect option when you're after something light..

To the recipe...

Ingredients
  • Hairy Gourd
  • Chinese Dried Scallop (soaked overnight)
  • 2 tsp cornstarch mixed in 1/4 cup of water
Method
  1. Soak the dried scallop overnight so they soften.
  2. Slice melon into medium chunks, it depends how you like it. If you're running low on time, slice it thinly so its quicker to steam.
  3. Steam the melon til its soft, you can check by poking a chopstick through it.
  4. Heat up the wok, add the scallop and also the water it was soaking it.
  5. Add some sugar to taste
  6. Add the cornstarch water to thicken the sauce
  7. Pour onto the melon and serve


    image name

    Monday, January 26, 2009

    Zucchini and Bacon Quiche

    Happy Chinese New Year !

    To celebrate our Chinese New Year this year we invited a few of our good friends over for a lunch as mostly everybody is busy due to family dinner plans. It was another chance for me to cook up something :)

    The menu of the day became what I could find in the shops on Saturday which turned out to be chicken salad, some pastry wraps from Lenards and garlic bread :P That together with our fruits in the kitchen didn't seem to be quite enough for about 10 people with 4 guys ("why do guys eat more?") I remembered having a really nice zucchini slice at my other friends place earlier this year and decided to make a zucchini quiche as I still had some shortcrust pastry and whipping cream together with some zucchini in the house.

    I've made a very nice quiche lorraine from a French recipe book called "The food of France) before but hadn't made a second one since. I wanted to add zucchini to the quiche but didn't know what other ingredients I should add to make it tasty. In my attempt to check out what's been tried and tested on the net, I came across a nice zucchini quiche recipe from Epicurious and also a zucchini slice recipe from taste.com.au. I'd probably try this one by itself next time, it looks very easy :)

    With my homework done I set out to incorporate some of these ideas to the quiche lorraine recipe that I had tried.


    image name


    Ingredients
    • 1 Tart Pastry (I used pampas shortcrust pastry)
    • 25g butter
    • 300g diced bacon
    • 250ml double cream (I substituted with 1 cup of milk and 1 cup of whipping cream)
    • 4 Eggs
    • 1/2 zucchini (was what I had left :P)
    • 1/2 onion
    • 1/4 teaspoon salt for the vegies
    • 1/4 teaspoon salt and 1/4 teaspoon of pepper for the egg mixture
    • Grated nutmeg to taste (I only had ground nutmeg and used about 1/2 teaspoon)
    Prepare
    • Prepare zucchini - scoop out the seeds to limit the moisture coming out. Cut it up in thin slices about 8x2cm wide.
    • Prepare the onion and bacon- finely diced up
    Method
    1. Cook bacon first. Melt butter in a frying pan and cook til golden, leave the oil in the pan. Drain bacon on paper towels.
    2. Cook the onion and zucchini with 1/4 teaspoon of salt til tender and browning. Take out and put into a colander to get rid of excess liquid
    3. Preheat oven to 200 degrees celcius. Line a 25cm tart tin with pastry.
    4. Place a piece of baking paper in the pastry and pour in some baking beads (dried beans or rice will do).
    5. Lightly prick base of pastry with a fork in a few spots.
    6. Bind bake pastry for 10 minutes.
    7. While its baking, mix cream, eggs and milk together with salt, pepper and nutmeg.
    8. Remove the paper and the beads and bake again for 3-5 minutes until pastry is just cooked but still very pale. (directly from the cookbook)
    9. Take out the pastry.
    10. Scatter the 1/2 of the bacon, zucchini and onion in the pastry.
    11. Add the remaining in the egg mixutre and pour into the pastry.
    12. Bake for 30 minutes or until the filling is set.
    13. Leave in the tin for 5 minutes before serving.

      image name


      The quiche was well received, though the pastry could have been done better and was quite hard to get off the pan. Luckily we had some skilled scapers who managed to cut up the quiche and serve each slice in one piece. I guess that's more motivation to try making some myself :)


      Friday, January 23, 2009

      Tofu from Japan

      This post is slightly diverted from our blue kitchen in Perth. Still Life With is one of the blogs I follow quite often and I just love the photography there. One of my secret little aspirations is to be a food photographer, though I have a lot to work on in terms of composition, lighting and all sorts of things. For those that have similar aspirations, I find the monthly challenges on Still Life With are great to practice some food photography :)

      This month's challenge is Complete Protein and is my first time posting on the flickr group.

      I looked up protein on good 'ol Wikipedia (ah, where will we be without Wikipedia) and found that foods containing protein may not necessarily include all the essential amino acids and dietary needs of a human. 'Complete Protein' contains a balanced set of the essential amino acids, these include meat, poultry, eggs, fish, milk, cheese and soy beans. However views of soy beans being a complete protein are contested. Nonetheless, I love soy beans.

      Coming from an Asian background, we grew up with them. We have soy in many of our dishes, from the normal tofu to tofu-fa (which is like a sweetened tofu dessert that you can get at dim sum places), soy milk and many more.


      image name

      I chose to post this photo as my first on the flickr group. I took it during our Japan Honeymoon in November last year.

      Apparently Kyoto is famous for tofu and there have many restaurants that specialise in tofu cuisine. I think the most famous is yudofu (湯豆腐) which is tofu cooked in soup/broth and yuba which is sort of like tofu skin.

      It was one of the best tofu I've ever had. The texture was tender, not too soft and brittle. It was really smooth and the flavour was subtlety nice. It was a cold dish which turned out perfect as we were exhausted and sweaty after walking around half of Kyoto. A very simple dish, basically just tofu and I think they

      Hope you like the photo :)

      Monday, January 19, 2009

      Stir Fry Capsicum and Honey Pepper Beef

      Chinese is our staple dinner almost every night. I had tired to learn my favourite mum recipes when I first moved out by myself a few years ago. Since then, I've been lucky enough to cook up a few of my own :) Nothing too extravagant, just nice and homely :)

      Tonight's dinner was a combination of some left overs, chicken soup, stir fried bean sprouts and capsicum beef. Its usually what I can cook up from a few specials we find in the markets. The winner of the night turned out to be the capsicum beef stir fry with beef in honey pepper sauce.

      Ingredients
      • About 250g of beef
      • 1 yellow capsicum
      • 1 green capsicum
      • 1/2 onion
      • 2 tablespoons of Honey
      • Cracked black pepper
      • Salt
      Marinade
      • 2 tablespoons soy sauce (light)
      • 1/2 teaspoon of sugar
      • 2 teaspoons of cracked black pepper
      • 2 teaspoons of cornstarch
      Method
      1. Slice the capsicum into thin slices (1cm) and the onion into slightly thicker slices (1.5-2 cm).
      2. Slice beef into thin slices about the same width as the capsicum
      3. Marinate the beef for about 20-30 minutes.
      4. Heat Wok, add 1 tablespoon of oil.
      5. Cook onions first til slightly soft then add capsicums. Add 1/2 teaspoon of salt.
      6. Cook for about 3 minutes til the vegies are half done and take them out.
      7. Clean the wok and heat it up again.
      8. Add 1 tablespoon of oil, seal the beef. Keep tossing it to stop it from burning on the wok.
      9. Once the beef are sealed (just on one side is enough), add the vegies and toss together.
      10. If you find its too dry, add about 2 tablespoon of water and put the cover on.
      11. Once beef is cooked, add honey and cracked black pepper to taste.
      12. Dish up and serve :)

      image name


      I had to slice up a nice piece of scotch fillet steak as I didn't have any beef fillet handy at home. It turned out just as nice, if not better :) The whole cooking process only takes a few minutes. I followed my mum's stir fry principle which is:

      "cook the vegies; add some salt -> take it out ->
      cook the meat -> add back the vegies -> serve it up"


      The only problem was that by the time I had finished cooking, we were pretty famished and there was not really much time to take out the DSLR. Though our little canon point and shoot does an "ok" job, it feels like there is something lacking in the photo. I wonder how I can make a chinese dish look good on camera, especially if it's stir fry so all the bits and pieces are tossed together...

      Sunday, January 18, 2009

      Apple Pie Trial #1

      I bought a bag of nice green granny smith apples last weekend and wanted to make my first attempt an an apple pie. Though after flipping through some of my favourite blog/recipe sites and my cookbooks, I just couldn't decide which type to make o_0 ... It occurred to me that I couldn't make one big apple pie since there were only two of us and it'll be so hard to eat the remaining parts once it's all cut up.

      So I decided on mini apple pies would be perfect since we could easily reheat or perhaps just take to work if we didn't finish. I wasn't sure of the exact texture that I wanted but it's a good start to try making the filling :)

      image name


      Ingredients
      • 3 Small Granny Smith Apples
      • 1/2 teaspoon of Cinnamon Powder
      • 1 tablespoon brown sugar
      • 2 sheets of pampas shortcrust pastry

      Method
      1. Preheat oven to 180 degrees celcius.
      2. Chop up apples into small cubes (I placed them into a bowl of water with a tablespoon of lemon juice to stop them from turning yellow)
      3. Heat up skillet and cook apples
      4. Add the cinnamon and the sugar
      5. Cook apples til it dries up (like a sticky mixture)
      6. Cut pastry into circles to fit your muffin tin

      The pastry was a bit too crunchy and seemed to suit a savory tart more than an appie pie; not the mention the inconsistent sizes :P I could just hear my better half giggle behind me, though its ok for the two of us, but I think I'll make a better effort next time to make sure they're all the same :)

      I think the apples could do with a bit more cinnamon, so I think next time I should up the amount to at least 1 teaspoon.


      image name

      I saw this post from Coffee and Vanilla. If you have a look at the link the pie pastry look so much nicer and crumblier. I think this was the sort of texture I wanted to achieve and I think I'll make that my trial #2 :)

      Friday, January 9, 2009

      Mint Peas


      Today we are going to have pasta and being the Chinese brought-up me, I have to have some vegies on the side otherwise dinner just doesn't seem like dinner. There was nothing much apart from a packet of peas left in the fridge as we did a good job at cleaning up the left overs from Christmas and New Years.

      I started thinking what would go well with peas and that we have around the house. I wanted something light as we have been having a heatwave of 37 degrees celcius here in Perth. My mind wandered to our mint plant which had been under utilised since last year and the leaves had just been looking at me for the past few days :) With some web surfing, I made some modifications to this recipe on the
      eHow website:


      Ingredients
      • 1 Tbsp of Finely Chopped Mint Leaves
      • 1-1.5 lbs of Fresh Sugar Snap Peas (I had normal snow peas only)
      • 2 Tbsp of unsalted butter

      Method
      1. Wash and snap of ends of the peas. I also peel of the fibre on the sides.
      2. Boil peas in boiling water (add a bit of salt to it) until its cooked but still crisp
      3. Cool peas in a colander with running water, you can use ice
      4. Melt the butter in skillet over medium-low heat, add the peas and half the mint.
      5. Add some salt and ground black pepper to taste


        I only used half the mint from the recipe as I didnt want it to be over powering. The fresh mint from the garden was very fragant, I noticed the flavour was stronger if I shredded them right before adding them to the peas :)


        We served the peas as a side with some light pesto pasta and chicken from Lenards ~ yummm ~